YodaDrive
YodaDrive is an easy way to integrate RDR collections in your Windows File Explorer. It is a WebDAV client for Windows that allows users to mount a remote WebDAV server as a local drive.
Open access: Note that you cannot access data via YodaDrive without authentication. To download data without logging in to the RDR we recommend using Cyberduck instead.
If you encounter problems or errors when using YodaDrive, you can contact the ICT helpdesk (email: icthelpdesk@ru.nl, telephone: 0031 (0)24 3622222).
Step 1: Download and install YodaDrive
Download and install YodaDrive from here. You need administrator privileges to complete the installation procedure. If you work on a PC or laptop managed by Radboud University, please contact the ICT helpdesk to gain temporary administrator privileges.
Step 2: Open YodaDrive
After installation, open YodaDrive by clicking on the system tray icon:
Next, choose Manage.
Step 3: Configure YodaDrive
Enter the following information:
Drive name: Enter a name for your Yoda Network Drive
Drive letter: Select a drive letter – any free letter is okay
URL:
Open access: Enter public.data.ru.nl
OA for Registered Users, Restricted access and Reviewer access: Enter webdav.data.ru.nl
Optional for all: Instead of the general URL, you can enter the specific WebDAV URL of a collection you want to access
Login and Password:
Open access: Unfortunately, you cannot access data via YodaDrive without authentication. This means that you need an RDR user profile and have to fill in your credentials as shown as shown under OA for Registered Users and Restricted access. To download data without logging in to the RDR we recommend using Cyberduck instead.
OA for Registered Users and Restricted access: Fill in your data access credentials. You can find these credentials on the top right of the RDR under [Your name] > Data access credentials
Reviewer access: Use the anonymous username and password of the data access account assigned to you when you followed the reviewer URL. These credentials can be found on the top right of your screen under the pseudonym reviewer of [collection name] > Data access credentials. There is no need to create an account to review a collection in the RDR
Optional: Check the following boxes: Remember Password (do NOT check this box if you are on a publicly accessible PC or laptop), Auto-mount drive and Start with Windows
Click Save, then Mount and you can now view the Yoda Network Disk in your File Explorer.
Step 4: Open an RDR collection
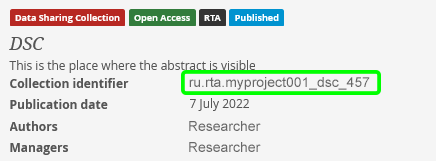
The name of the folder of a collection is based on the collection identifier. This identifier can be found in the RDR underneath the title and abstract.
The collection identifier consists of the following parts:
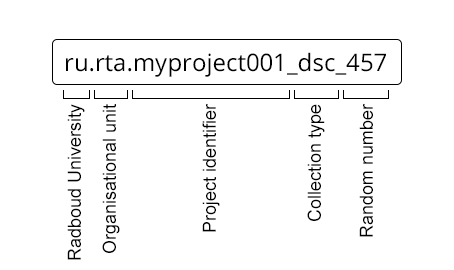
These parts correspond to the folder structure in Finder (i.e. first the organisational unit and then the last part of the collection identifier).
Step 5: Open or ‘download’ files
You are currently in the folder that corresponds to the collection you want to access. You can open or copy the files in this folder just as you would do in ‘regular’ folders in Windows File Explorer. Note that you cannot edit the files in the mounted Yoda Network Drive: changes are not saved.